Let’s explore how to build a completely custom mobile app sourcing data from a Salesforce Managed Package.
Overview
As an enterprise organization, offering a mobile app with complete control of the user interface and branding is desirable. Here, in this blog, we will go through the process of building a fully custom mobile application, that will have no scalability restrictions and any type of custom UI can be designed for it.
Best Suited Use Cases
When the focus of the mobile app is user-experience and custom UX design, building a fully custom app could scale well. If you are building an enterprise application with a vision of specific use-cases and user interfaces, the above described approach may be the best fit for you.
Design / Architecture
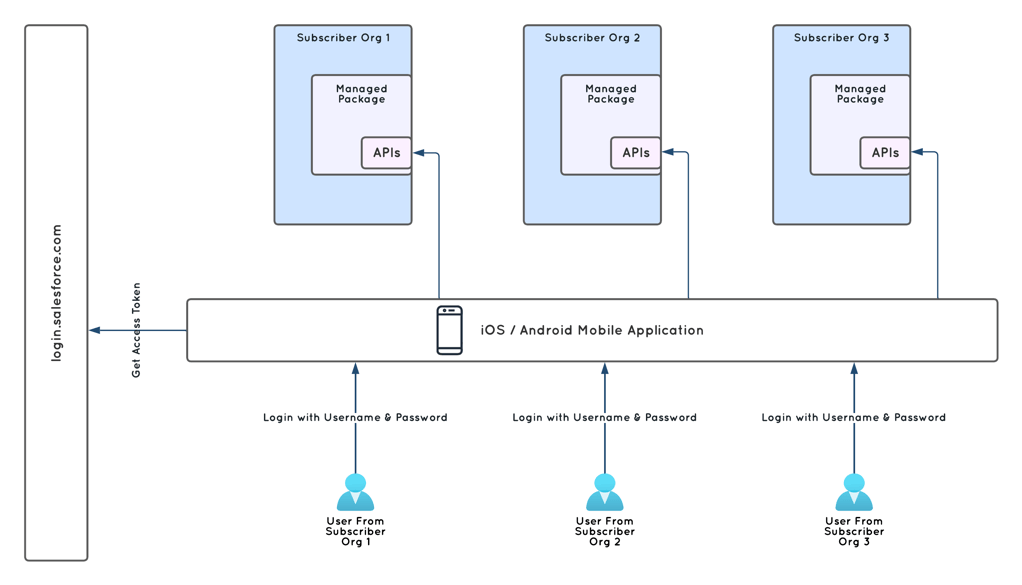
The mobile application to be built is intended to work with all subscriber orgs. For a seamless login experience, the user is expected to just enter username and password. Once an access token and instance url is received from login.salesforce.com, the mobile app will use that to make resource calls to the respective subscriber org. Once an access token expires, a new access token is then requested from Salesforce’s authentication server.

Authentication
The goal for a seamless authentication experience for potential users of your application is to type in a username and password, and not worry about Client Id or Client Secret. The complexity here is, you are building one mobile application that interacts with all Subscriber orgs, and each one of those has a separate client id and secret.
In the ISV space, Salesforce provides a service for whitelisting the Client Id and Secret. For availing this service, an ISV partner is expected to create a case in the partner community, post security review approval. With the packaged connected app, the same Client Id and Secret can be used to authenticate in any of the Subscriber Orgs with the Managed Package installed. This Managed Package has to pass Security Review, for the whitelisting service to be requested.
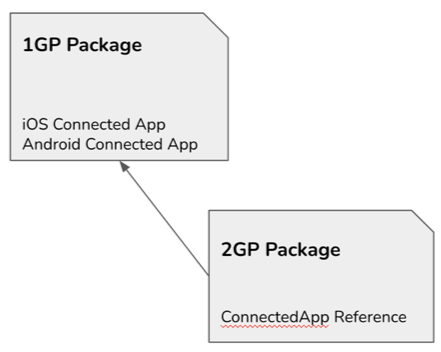
To create a Managed Package with a connected app in 1st Generation Packaging (1GP) is easy, as the connected app component can be included before creating a package. For 2nd Generation Packaging (2GP), the process is a bit more complex. A 1GP package with the same namespace is to be created and released. The reference to the connected app is to be included in the 2GP package, as shown below.
<?xml version="1.0" encoding="UTF-8" ?>
<ConnectedApp xmlns="http://soap.sforce.com/2006/04/metadata">
  <developerName>namespace__Custom_Mobile</developerName>
  <label>Custom Mobile</label>
  <version>3.0</version>
</ConnectedApp>
Please Note, Connected App subscriptions to a Custom Notification Type will not work in this scenario and unfortunately, there are no workarounds. Also, two separate connected apps will need to be packaged in the 1GP package and included in the 2GP package as a reference (if creating a 2GP package). This is done so as to be able to include the Push notification settings for iOS and Android operating systems separately.
Interacting with Subscriber Data
Salesforce offers a range of standard REST endpoints as part of the platform features, that can be called by a user with access to the Org and access to the requested data. These endpoints are very SObject specific. They are defined in the following way.
https://MyDomainName.my.salesforce.com/services/data/v58.0/sobjects/Account
In this example, Account object records can be accessed. To learn more about Salesforce REST APIs, please check out the documentation here – https://developer.salesforce.com/docs/atlas.en-us.api_rest.meta/api_rest/intro_rest_resources.htm.
In a number of data fetching scenarios, data from multiple objects may need to be shown on a single mobile UI page. In such cases, it may be inefficient to make multiple calls to fetch all the data. That leads to a requirement for custom REST endpoints. Using APEX, custom REST endpoints can be created as global classes and packaged.

When a custom REST endpoint is written as a global class and packaged, it is accessible in all subscriber orgs where the package is installed. The main difference in access between a packaged custom REST endpoint vs an unpackaged one is that the URL would contain a namespace, as shown below.
https://MyDomainName.my.salesforce.com/services/apexrest/packageNamespace/MyMethod
Managing Permissions
The general best practices around managing permissions for an ISV product are to use Permission Sets to capture object and field level access. With Permission Sets we will be able to ensure identical access control restrictions on the desktop browser as the Mobile app. Along with object and field access, class access for the REST endpoint classes would also be necessary.
Push Notifications
In delivering a push notification using the packaged connected app, custom apex code is to be written, a separate block for iOS and a separate one for Android.

The architecture of PUSH notification service is usually designed as shown in the diagram here. Here, I am using Google Firebase as an example for a cloud push service that can be leveraged to register a device and also send push messages. Apple Push Notification Service (APNS) is a service offered by Apple, specifically for push messages to iOS devices, similar to Firebase. In such scenarios, Firebase could be used for both Android and iOS devices. By using the connected app and Salesforce’s classes, we could bypass building/using a PUSH server. Salesforce handles that under the covers.
First step for a mobile app to be capable of receiving a PUSH notification, would be to register the device upon login. It is done using a POST call to the MobilePushServiceDevice (https://ap1.salesforce.com/services/data/v31.0/sobjects/MobilePushServiceDevice/) REST endpoint.
That is followed by using Apex to create notifications, one for Android, another for iOS. The following code shows how to send push notifications from Apex to a specific connected app for iOS. Salesforce provides the apple() method in PushNotificationPayload class for specifically connecting to the Apple Push Notification Service (APNS).
Messaging.PushNotification msg = new Messaging.PushNotification();
Map<String, Object> payload = Messaging.PushNotificationPayload.apple(body, '', null, null);

Map<String, Object> aps = (Map<String, Object>) payload.get('aps');
aps.put(CONTENT_AVAILABLE, 1);

payload.put(TITLE, title);
msg.setPayload(payload);

if (!Test.isRunningTest() && (Limits.getMobilePushApexCalls() < Limits.getLimitMobilePushApexCalls())) {
  msg.send(MOBILE_IOS_CONNECTED_APP, users);
}
The below code works for Android in a similar way. There are no Android specific methods, building the payload map is sufficient.
Messaging.PushNotification androidMsg = new Messaging.PushNotification();

Map<String, Object> androidPayload = new Map<String, Object>();

androidPayload.put(ALERT_TITLE, title);

androidPayload.put(ALERT_BODY, title);

androidMsg.setPayload(androidPayload);

if (!Test.isRunningTest() && (Limits.getMobilePushApexCalls() < Limits.getLimitMobilePushApexCalls())) {

androidMsg.send(MOBILE_CONNECTED_APP, users);

}
It is important to note that the number of PUSH notifications that can be sent in an hour is currently limited to 10,000 in this approach.
